Testing
Django includes a test runner witch can be run by issuing the python manage.py test command.
However, when writing 3rd party modules I like to use a slightly different approach. It includes creating
a proper setup.py file, the nose and tox testing frameworks.
The setup script
Let’s start by creating a setup.py file. This file will be used to run test suite and later build,
package and upload the module to pypi.
Make sure you create this file in the projects working directory (next to all the other files we created earlier).
(django-foobar):~/django-foobar$ touch setup.py
We’ll base our setup script on Setuptools.
In order to make this as painless as possible, some nice people has created a bootstrap script for setuptools
which we’ll take advantage of. Download the ez_setup.py script and place it in the projects working directory.
(django-foobar):~/django-foobar$ curl -O https://bootstrap.pypa.io/ez_setup.py
Once downloaded, open the setup.py file in a text editor and enter the following code.
import re
import os

try:
    from setuptools import setup
except ImportError:
    from ez_setup import use_setuptools
    use_setuptools()
    from setuptools import setup

setup(
    name="django-foobar",
    version="1.0",
    description="Super awesome portable module for Django",
    long_description="Here you can elaborate a bit to explain the use case and purpose of the module.",
    author="John Doe",
    author_email="john.doe@example.com",
    url="https://github.com/github-user/django-foobar",
    download_url="https://github.com/github-user/django-foobar.git",
    license="MIT License",
    packages=[
        "django_foobar",
    ],
    include_package_data=True,
    install_requires=[
        "Django>=1.7.0",
    ],
    tests_require=[
        "nose",
        "coverage",
    ],
    zip_safe=False,
    test_suite="tests.runtests.start",
    classifiers=[
        "Operating System :: OS Independent",
        "Development Status :: 3 - Alpha",
        "Environment :: Web Environment",
        "Framework :: Django",
        "Intended Audience :: Developers",
        "License :: OSI Approved :: MIT License",
        "Programming Language :: Python :: 2",
        "Programming Language :: Python :: 3",
        "Topic :: Software Development :: Libraries :: Python Modules",
    ]
)
As you can see, this file contains all sorts of useful information about the author of the module,
licensing stuff, development status, etc. More importantly for us now, it contains information about which
libraries are required for installing the library, and which are required for testing the library.
This means, that if you want to run the test suite, all the libraries listed in the tests_require
list will be installed, but if somebody runs pip install django-foobar, only the libraries which
we actually depends on, listed in install_requires will be installed (if not already installed).
The important thing here is to know what library versions are the absolute minimum for us to have installed for the library to work. In other words, you should never (or at least rarely) lock library versions in this file, but rather specify that we require version >= (larger than or equal to) some version number. So in the example above, we promise that our code will work with any Django version above v1.7.0.
Note
Keep in mind that you should consider the requirements you specify in this file to be a kind of contract between you as the maintainer and the people which are going to use your code.
You need to write tests in order to fulfill the contract!
Read more about setup.py.
Setting up the test runner
Running nose tests
In the setup.py file above, we have specified a test_suite attribute which points to
tests.runtests.start. Create a new file called runtests.py in the tests project directory,
and enter the following code:
#!/usr/bin/env python

from __future__ import absolute_import, print_function, unicode_literals

import os
import sys
import nose

def start(argv=None):
    sys.exitfunc = lambda: sys.stderr.write("Shutting down...\n")

    if argv is None:
        argv = [
            "nosetests", "--cover-branches", "--with-coverage",
            "--cover-erase", "--verbose",
            "--cover-package=django_foobar",
        ]

    nose.run_exit(argv=argv, defaultTest=os.path.abspath(os.path.dirname(__file__)))

if __name__ == "__main__":
    start(sys.argv)
Bootstrapping Django for the test runner
In order to let the test runner and setup script to be able to run Django tests, we need to initialize
Django before running the tests. Enter the following code into tests/__init__.py.
from __future__ import absolute_import, unicode_literals
import os

test_runner = None
old_config = None

os.environ["DJANGO_SETTINGS_MODULE"] = "tests.settings"

import django
if hasattr(django, "setup"):
    django.setup()

def setup():
    global test_runner
    global old_config

    # If you want to support Django 1.5 and older, you need
    # this try-except block.
    try:
        from django.test.runner import DiscoverRunner
        test_runner = DiscoverRunner()
    except ImportError:
        from django.test.simple import DjangoTestSuiteRunner
        test_runner = DjangoTestSuiteRunner()

    test_runner.setup_test_environment()
    old_config = test_runner.setup_databases()

def teardown():
    test_runner.teardown_databases(old_config)
    test_runner.teardown_test_environment()
Running the test suite
Alright, now we have a good setup for running tests!
We will no longer be writing the tests inside the django_foobar module, so you can delete the
django_foobar/tests.py file.
Try running the test suite by running the following command from the working directory:
(django-foobar):~/django-foobar$ python setup.py test
running test
running egg_info
writing pbr to django_foobar.egg-info/pbr.json
writing django_foobar.egg-info/PKG-INFO
writing top-level names to django_foobar.egg-info/top_level.txt
writing dependency_links to django_foobar.egg-info/dependency_links.txt
writing requirements to django_foobar.egg-info/requires.txt
reading manifest file 'django_foobar.egg-info/SOURCES.txt'
writing manifest file 'django_foobar.egg-info/SOURCES.txt'
running build_ext

Name                       Stmts   Miss Branch BrMiss  Cover   Missing
----------------------------------------------------------------------
django_foobar                  0      0      0      0   100%
django_foobar.admin            1      1      0      0     0%   1
django_foobar.migrations       0      0      0      0   100%
django_foobar.models           1      1      0      0     0%   1
----------------------------------------------------------------------
TOTAL                          2      2      0      0     0%
----------------------------------------------------------------------
Ran 0 tests in 0.406s

OK
As you can see, the setup script builds an egg for us and runs the test suite against it. As we haven’t written any actual test cases yet, it will print out the test coverage and report that zero tests were run.
Writing a test case
Start by creating a new file in the tests directory called test_views.py. The test runner will
pick up any file prefixed with test_ and run the test cases inside it.
We will write a test case for the DeepThoughtView we created earlier. Open the tests/test_views.py
file and enter the following code inside:
# -*- coding: utf-8 -*-

from __future__ import absolute_import, unicode_literals

from django.core.urlresolvers import reverse
from django.test import TestCase


class DeepThoughtTestCase(TestCase):

    def test_deepthought_view(self):
        response = self.client.get(reverse("django_foobar_deepthought"))
        self.assertEqual(response.content, b"42")
Alright, lets try running the test suite again!
(django-foobar):~/django-foobar$ python setup.py test
running test
running egg_info
writing pbr to django_foobar.egg-info/pbr.json
writing django_foobar.egg-info/PKG-INFO
writing top-level names to django_foobar.egg-info/top_level.txt
writing requirements to django_foobar.egg-info/requires.txt
writing dependency_links to django_foobar.egg-info/dependency_links.txt
reading manifest file 'django_foobar.egg-info/SOURCES.txt'
writing manifest file 'django_foobar.egg-info/SOURCES.txt'
running build_ext
test_deepthought_view (tests.test_views.DeepThoughtTestCase) ... ok

Name                       Stmts   Miss Branch BrMiss  Cover   Missing
----------------------------------------------------------------------
django_foobar                  0      0      0      0   100%
django_foobar.admin            1      1      0      0     0%   1
django_foobar.migrations       0      0      0      0   100%
django_foobar.models           1      1      0      0     0%   1
django_foobar.views            6      0      0      0   100%
----------------------------------------------------------------------
TOTAL                          8      2      0      0    75%
----------------------------------------------------------------------
Ran 1 test in 0.349s
Sweet, the test runner picked up our test case and reported success!
Testing multiple environments
Well, that’s good and all, but at the current state, we only know that our code works as it should on the setup we’re using for our development. What if somebody is running Python v2.7 with Django v1.6? Would it work as it should? We don’t really know, so let’s find out!
Tox to the rescue!
Tox is a tool for automate testing in Python. It does so by reading
a tox.ini file where we specify the environments we want to test, and it will create a brand new
virtual environment for that setup and run the test suite against it.
Let’s start by installing tox and add it to our requirements.txt file.
(django-foobar):~/django-foobar$ pip install tox
(django-foobar):~/django-foobar$ echo "tox" >> requirements.txt
Create a new file tox.ini in the projects working directory and paste the content below.
[tox]
envlist =
    py27-django1.6,
    py34-django1.8

[django1.6]
deps =
    Django>=1.6,<1.7

[django1.8]
deps =
    Django>=1.8,<1.9

[testenv]
commands =
    python {toxinidir}/setup.py test

[testenv:py27-django1.6]
basepython = python2.7
deps =
    {[django1.6]deps}

[testenv:py34-django1.8]
basepython = python3.4
deps =
    {[django1.8]deps}
As you can see we have a [tox] block in which we defines a list of environments we want to test.
Next, we define some blocks for the different Django versions we want to test. The [testenv] block
defines the command we want to run, and finally we combine the [testenv] with the different version
blocks in order to fire up the test runner.
Note
You need to have all the python interpreters you want to test with installed on your system. If you don’t have Python 2.7 installed, the Python 2.7 tests above will fail!
Now we have two different environments we can test: Python 2.7 with Django 1.6, and Python 3.4 with Django 1.8. Let’s try to fire it up!
(django-foobar):~/django-foobar$ tox
<snip>
...
...
</snip>
  py27-django1.6: commands succeeded
  py34-django1.8: commands succeeded
  congratulations :)
Great! We are now confident that our code works flawlessly with these configurations.
Continuous Integration
Continuous Integration is nice. Alright that was yet another opinionated statement from me, but it makes me happy to see my builds go green =)
Travis is my weapon of choice because all my code goes to Github, and Travis
integrates very easily. Create a new file .travis.yml in your projects working directory and paste the
following code.
language: python
python:
  - "2.7"

cache:
  directories:
    - pip_download_cache

before_install:
  - mkdir -p $PIP_DOWNLOAD_CACHE

install:
  - pip install tox
  - pip install -e .

script:
  - tox -e $TOX_ENV

env:
  global:
    - PIP_DOWNLOAD_CACHE="pip_download_cache"
  matrix:
    - TOX_ENV=py27-django1.6
    - TOX_ENV=py34-django1.8

notifications:
  email: false
As you can read out from the configuration, we’ll be using tox to run the test suite on Travis as well.
You should be able to recognize the tox environments we created earlier in the travis configuration above.
Time to make the build!
Head over to Travis and hit the “Sign in with Github” button in the top right corner.
Navigate to your profile and locate the repository list. There should be a a flip switch next to the repository name. Flip it to “On”.
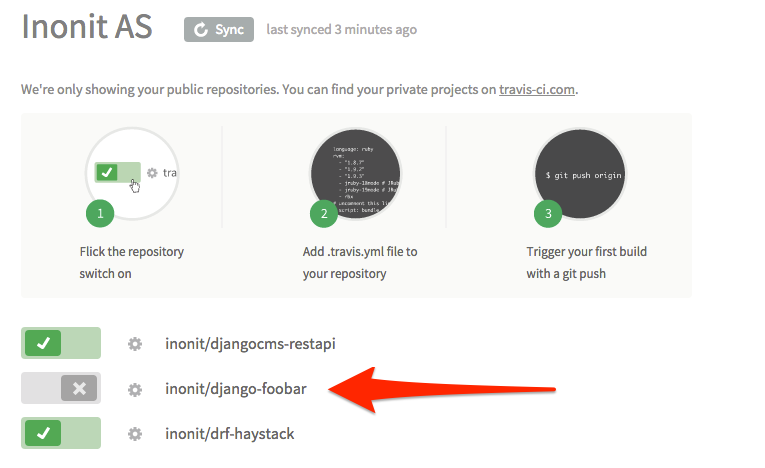
Once the flip is on, Travis will start an automated build whenever a new commit is pushed to the Github repository.
Commit and push new stuff to Github.
(django-foobar):~/django-foobar$ git add *
(django-foobar):~/django-foobar$ git commit -m "a brand new commit"
(django-foobar):~/django-foobar$ git push -u origin master
Enjoy the build!
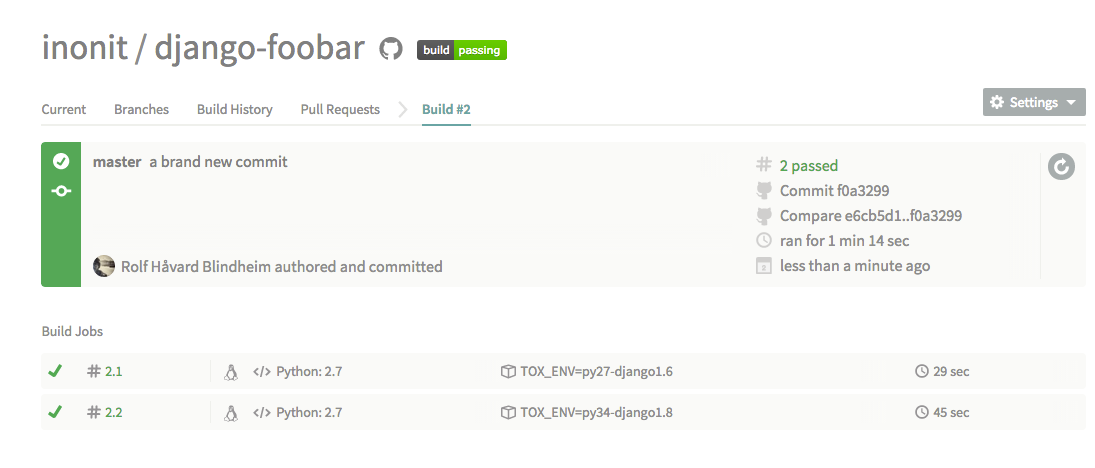
Holy cow, it worked!